Garagem
This is my blog, mostly with code snippets and interesting stuff - like this LED on the right. Using the search (s) is easier to find things here. |  |
Posts
Quotes
Tony Hoare
http://alloytools.org/tutorials/day-course/s1_logic.pdf
| One way is to make it so simple there are obviously no deficiencies, and the other way is to make it so complicated that there are no obvious deficiencies. |
|---|
Richard P. Feynman
http://alloytools.org/tutorials/day-course/s1_logic.pdf
| The first principle is that you must not fool yourself, and you are the easiest person to fool. |
|---|
Windows cheatsheet
Prompt
mode List all COM ports
Commands
eventvwr.msc Event viewer.
ncpa.cpl Network settings.
appwiz.cpl Install/Uninstall software.
netplwiz Config to allow login without password
- This checkbox disapeared in Windows 10! Bring it back with:
reg ADD "HKLM\SOFTWARE\Microsoft\Windows NT\CurrentVersion\PasswordLess\Device" /v DevicePasswordLessBuildVersion /t REG_DWORD /d 0 /f
sysdm.cpl System properties; Env vars; Enable remote desktop access
GodMode.{ED7BA470-8E54-465E-825C-99712043E01C} Create a folder with this name shows lots of settings.
Intl.cpl Regional settings dialog.
mmsys.cpl Sound settings.
Keyboard Shortcuts
Windows + r Run
Alt + d in Windows Explorer and then cmd to open the command prompt in that folder.
Windows + Alt + g Xbox game bar that allows you to record the screen among other things.
List USBs
Get-PnpDevice -PresentOnly | Where-Object {$_. InstanceId -match '^USB'}
Add stuff to PATH for a particular session
I needed to run QEMU for a project, but did not want to change my %PATH% variable adding the QEMU instalation path just for a temporary thing.
My solution was to create a qemu-cli.bat that launches a prompt with %PATH%:
cmd /K set PATH=%PATH%;"C:\Program Files\qemu"
Windows 11 Mouse Right button click
Restart the Windows Explorer process after any of the following procedures!
Show expanded menu by default:
reg add "HKCU\Software\Classes\CLSID\{86ca1aa0-34aa-4e8b-a509-50c905bae2a2}\InprocServer32" /f /ve
Show original windows 11 crap mode (undo)
reg delete "HKCU\Software\Classes\CLSID\{86ca1aa0-34aa-4e8b-a509-50c905bae2a2}" /f
Windows 10 Cleanup
Do this after a fresh windows installation
Free more disk space avoiding hibernation:
Open cmd as administrator;
powercfg -h off
Uninstall bloatware
PowerShell as administrator:
Get-AppxPackage -AllUsers | Remove-AppxPackage
Put back the Microsoft store:
Get-AppxPackage -allusers Microsoft.WindowsStore | Foreach {Add-AppxPackage -DisableDevelopmentMode -Register "$($_.InstallLocation)\AppXManifest.xml"}
Now it is a good time to install the camera and calculator apps back (from MS store). As image viewer you can use FastStone
Configuring updates
Open Group Policy Editor (gpedit.msc):
- Computer Configuration -> Administrative Templates -> Windows Components -> Windows Update -> Configure Automatic Updates -> 2 - Notify for download and notify for install.
- Computer Configuration -> Administrative Templates -> Windows Components -> Windows Update -> Turn on Software Notifications -> Enabled.
- Computer Configuration -> Administrative Templates -> Windows Components -> Windows Update -> Allow Automatic Updates immediate installation -> Disabled.
- Computer Configuration -> Administrative Templates -> Windows Components -> Windows Update -> Turn on recommended updates via Automatic Updates -> Enabled.
- Computer Configuration -> Administrative Templates -> Windows Components -> Application compatibility -> Turn off application telemetry.
- Computer Configuration -> Administrative Templates -> Windows Components -> Data collection and preview builds -> Allow telemetry - 0 (security).
Disable transparency using regedit
HKEY_CURRENT_USER\SOFTWARE\Microsoft\Windows\CurrentVersion\Themes\Personalize
Linux cheatsheet
Packages
List installed packages:
dpkg --get-selections | grep -v deinstallapt list --installed
Getting timestamp
05/Mar/2023
Getting timestamp in python:
import datetime

now = datetime.datetime.now()
timestamp = now.strftime('%Y-%m-%d_%H:%M:%S'.format(now))
print (timestamp)
Getting timestamp in C:
#include <time.h>
#include <stdio.h>
#include <string.h>
#include <stdlib.h>

int timestamp(char *buff, int len, int precise)
{
        int ret = 0;
        time_t time_now = 0;
        struct tm timeinfo = { 0 };

        time(&time_now);
        localtime_s(&timeinfo, &time_now);
    memset(buff, 0x0, len);

    if (precise)
        {
        ret = _snprintf_s(buff, len, "%04d-%02d-%02d.%02d:%02d:%02d",
                        (timeinfo.tm_year + 1900), (timeinfo.tm_mon + 1), timeinfo.tm_mday,
                        timeinfo.tm_hour, timeinfo.tm_min, timeinfo.tm_sec);
        }
        else
        {
        ret = _snprintf_s(buff, len, "%02d:%02d:%02d",
                        timeinfo.tm_hour, timeinfo.tm_min, timeinfo.tm_sec);
        }
        return ret;
}
Getting timestamp in batch:
@echo off
SETLOCAL
CALL :GetTimestamp now
echo timestamp = %now%
EXIT /b %ERRORLEVEL%

:GetTimestamp
FOR /F %%A IN ('WMIC OS GET LocalDateTime ^| FINDSTR \.') DO @SET B=%%A
SET y=%B:~0,4%
SET mo=%B:~4,2%
SET d=%B:~6,2%
SET h=%B:~8,2%
SET m=%B:~10,2%
SET s=%B:~12,2%
SET timestamp=%d%-%mo%-%y% %h%:%m%:%s%
SET "%~1=%d%-%timestamp%"
EXIT /B 0
The date and time settings in use can be listed using PowerShell:
PS C:\Users\fgrando> (get-culture).DateTimeFormat | fl -property *


AMDesignator                     : AM
Calendar                         : System.Globalization.GregorianCalendar
DateSeparator                    : -
FirstDayOfWeek                   : Sunday
CalendarWeekRule                 : FirstDay
FullDateTimePattern              : dddd, d MMMM, yyyy HH:mm:ss
LongDatePattern                  : dddd, d MMMM, yyyy
LongTimePattern                  : HH:mm:ss
MonthDayPattern                  : MMMM d
PMDesignator                     : PM
RFC1123Pattern                   : ddd, dd MMM yyyy HH':'mm':'ss 'GMT'
ShortDatePattern                 : dd-MMM-yy
ShortTimePattern                 : HH:mm
SortableDateTimePattern          : yyyy'-'MM'-'dd'T'HH':'mm':'ss
TimeSeparator                    : :
UniversalSortableDateTimePattern : yyyy'-'MM'-'dd HH':'mm':'ss'Z'
YearMonthPattern                 : MMMM yyyy
AbbreviatedDayNames              : {Sun, Mon, Tue, Wed...}
ShortestDayNames                 : {Su, Mo, Tu, We...}
DayNames                         : {Sunday, Monday, Tuesday, Wednesday...}
AbbreviatedMonthNames            : {Jan, Feb, Mar, Apr...}
MonthNames                       : {January, February, March, April...}
IsReadOnly                       : False
NativeCalendarName               : Gregorian Calendar
AbbreviatedMonthGenitiveNames    : {Jan, Feb, Mar, Apr...}
MonthGenitiveNames               : {January, February, March, April...}
This info is also available in the GUI executing Intl.cpl
Check if git repo has new commits
05/Mar/2023
cd /your/repo

git fetch
git diff --quiet main origin/main || echo changes detected
Useful batch scripts
05/Mar/2023
Useful batch snippets
Get the script start directory:
ECHO Current Directory = %~dp0
ECHO Object Name With Quotations=%0
ECHO Object Name Without Quotes=%~0
ECHO Bat File Drive = %~d0
ECHO Full File Name = %~n0%~x0
ECHO File Name Without Extension = %~n0
ECHO File Extension = %~x0
Python temporary env
SET PYENV="%~dp0\tempy"
SET PYTMP"%~dp0\tempy\Scripts\python"
SET PIPTMP"%~dp0\tempy\Scripts\pip"

python -m venv %PYENV%
%PIPTMP% freeze

%PYTMP% -V
Usual labels for GOTO
SET STARTDIR="%~dp0"
SET ARG1=%1
SET ARG2=%2

IF "%FOLDER%" == "" (
    ECHO Missing argument.
)

CALL somescript.bat
IF NOT "%ERRORLEVEL%" == "0" (
    ECHO Failed to run command
    GOTO FAIL
)

GOTO END

:END
ECHO Done!
EXIT /B0

:SHOW_USAGE_AND_FAIL
ECHO Usage: %0 <argmument>
GOTO FAIL

:FAIL
ECHO FAILED!
EXIT /B 1
Kill a task
FOR /F "TOKENS=1,2,* delims==, " %%a IN ('TASKLIST /FI "WindowTitle -eq %NAME% /NH /FO CSV') DO (
    SET PID_FOUND=%%b
    ECHO Kill %NAME% %%b
    TASKKILL /PID %%b /F
)
Check if a file exists:
IF EXIST %filepath% (
    ECHO exists!
) ELSE (
    ECHO not found!
)

IF NOT EXIST %filepath% (
    ECHO not found!
)

IF NOT EXIST "C:\Program Files\7-Zip\7z" (
    WHERE 7z
    IF "%ERRORLEVEL%" == "1" (
        ECHO 7zip not found!
    )
)
List all files in a directory:
FOR /F tokens^=* %%i IN ('where .:*')DO (
	ECHO/ Path: %%~dpi ^| Name: %%~nxi
)

FOR /F tokens^=* %%i IN ('where /r %FOLDER% *.txt')DO (
	ECHO/ Path: %%~dpi ^| Name: %%~nxi
)
Checked mounted drives with subst:
FOR /F "delims=\" %%i IN ('SUBST')DO (
    IF "%%i" == "X:" (
        ECHO Drive X is already mounted
    )
)

FOR /f tokens^=* %%i in ('where /r %FOLDER% *.txt')DO (
	ECHO/ Path: %%~dpi ^| Name: %%~nxi
)
QEMU on Windows
05/Mar/2023
Steps to setup a running PPC vm in Windows with QEMU.
Get QEMU
Get Lubuntu 14
Add QEMU to path
set PATH=%PATH%;"C:\Program Files\qemu"
Create Disk
qemu-img create -f qcow2 be1/lubuntu14.qcow2 16G
Note: the disks is kept inside ./be1 folder.
Install OS
qemu-system-ppc -L pc-bios -boot d -M mac99,via=pmu -m 1024 -hda be1/lubuntu14.qcow2 -cdrom lubuntu-14.04.5-desktop-powerpc.iso
Run OS
qemu-system-ppc -L pc-bios -boot c -prom-env "boot-device=hd:,\yaboot" -prom-env "boot-args=conf=hd:,\yaboot.conf" -M mac99,via=pmu -m 2048 -hda be1/lubuntu14.qcow2 -device e1000,netdev=net0 -netdev user,id=net0,hostfwd=tcp::10022-:22
Connect via SSH
ssh user@localhost -p 10022
ARM
Based on this post this are the commands for a quick ARM setup: https://gist.github.com/billti/d904fd6124bf6f10ba2c1e3736f0f0f7
start.bat:
REM Ubuntu & BIOS images:
REM https://cloud-images.ubuntu.com/releases/xenial/release/
REM https://releases.linaro.org/components/kernel/uefi-linaro/latest/release/qemu64/

REM Expanding the image size by 8GB
REM shutdown the vm
REM "c:\Program Files\qemu\qemu-img.exe" resize ubuntu-16.04-server-cloudimg-arm64-uefi1.img +8G
REM start the vm, ssh into it and enter the following command
REM sudo growpart /dev/vda 1
REM reboot

REM ssh -l ubuntu localhost -p 22022 asdfqwer

"c:\Program Files\qemu\qemu-system-aarch64.exe" ^
-m 2048 ^
-cpu cortex-a72 -smp 4 ^
-nographic ^
-M virt ^
-bios QEMU_EFI.fd ^
-drive if=none,file=ubuntu-16.04-server-cloudimg-arm64-uefi1.img,id=hd0 ^
-device virtio-blk-device,drive=hd0 ^
-drive file=user-data.img,format=raw ^
-device virtio-net-device,netdev=net0 ^
-netdev user,hostfwd=tcp:127.0.0.1:22022-:22,id=net0
i386
REM Create disk
REM "c:\Program Files\qemu\qemu-img.exe" create hdd_i386.img 20G

REM Install commands
REM "c:\Program Files\qemu\qemu-system-i386.exe" ^
REM -m 2048 ^
REM -boot d -cdrom ubuntu-16.04.6-server-i386.iso ^
REM -hda hdd_i386.img ^
REM -device e1000,netdev=net0 ^
REM -netdev user,id=net0,hostfwd=tcp::22386-:22

REM ssh -l user localhost -p 22386 user

REM run
"c:\Program Files\qemu\qemu-system-i386.exe" ^
-m 2048 ^
-boot c ^
-nographic ^
-hda hdd_i386.img ^
-device e1000,netdev=net0 ^
-netdev user,id=net0,hostfwd=tcp::22386-:22
PowerPc64
REM Create disk
REM "c:\Program Files\qemu\qemu-img.exe" create  hdd_ppc64el.img 20G

REM Install commands
REM "c:\Program Files\qemu\qemu-system-ppc64.exe" ^
REM -m 2G ^
REM -M pseries -smp cores=1,threads=1 ^
REM -cdrom ubuntu-16.04.4-server-ppc64el.iso ^
REM -device spapr-vscsi -drive file=hdd_ppc64el.img ^
REM -device e1000,netdev=net0 ^
REM -netdev user,id=net0,hostfwd=tcp::22064-:22

REM -nographic -nodefaults -serial stdio ^

REM ssh -l user localhost -p 22064 user

REM run
"c:\Program Files\qemu\qemu-system-ppc64.exe" ^
-m 2G ^
-nographic ^
-M pseries -smp cores=1,threads=1 ^
-device spapr-vscsi -drive file=hdd_ppc64el.img ^
-device e1000,netdev=net0 ^
-netdev user,id=net0,hostfwd=tcp::22064-:22
XRDP setup
05/Mar/2023
Tested on Debian 11:
root@deblx:/home/user# apt install xfce4 xfce4-goodies xorg dbus-x11 x11-xserver-utils
root@deblx:/home/user# apt install xrdp
root@deblx:/home/user# adduser xrdp ssl-cert
root@deblx:/home/user# systemctl restart xrdp
user@deblx:~$ echo xfce4-session >~/.xsession
GCC and attribute((packed)) in Linux & Windows
05/Mar/2023
This program gives different outputs in windows and linux, even when compiled with similar same GCC versions. Fortunately, it is not a bug and just a matter of compiler flags.
#include <stdio.h>
#include <stdint.h>

struct __attribute__((packed)) {
        uint16_t flag:10;
        uint8_t data:6;
} st2Byte;

struct __attribute__((packed)) {
        uint8_t flag:2;
        uint8_t data:6;
} st1Byte;

struct __attribute__((packed)) {
        uint32_t data:16;
        uint16_t flag:8;
        uint16_t view:8;
} st4Byte;


int main(void)
{
    int expected = 2;
    int size = sizeof(st2Byte);
    printf("Expected: %d, got: %d - %s\n", expected, size, (size == expected ? "PASS" : "FAIL"));

    expected = 1;
    size = sizeof(st1Byte);
    printf("Expected: %d, got: %d - %s\n", expected, size, (size == expected ? "PASS" : "FAIL"));

    expected = 4;
    size = sizeof(st4Byte);
    printf("Expected: %d, got: %d - %s\n", expected, size, (size == expected ? "PASS" : "FAIL"));
    return 0;
}
| GCC | Output |
|---|---|
| gcc (Ubuntu 9.3.0-17ubuntu1~20.04) 9.3.0 | Expected: 2, got: 2 - PASS Expected: 1, got: 1 - PASS Expected: 4, got: 4 - PASS |
| gcc (MinGW-W64 x86_64-posix-seh, built by Brecht Sanders) 9.4.0 | Expected: 2, got: 3 - FAIL Expected: 1, got: 1 - PASS Expected: 4, got: 6 - FAIL |
In order to get the same results, we must specify if the struct attribute will be ms_struct or gcc_struct.
They resulted in different sizes because in Windows the default is ms_struct. See x86 Type Attributes.
We can achieve the same results using the following flag:
gcc test.c --mno-ms-bitfields
| GCC | Output |
|---|---|
| gcc (Ubuntu 9.3.0-17ubuntu1~20.04) 9.3.0 | Expected: 2, got: 2 - PASS Expected: 1, got: 1 - PASS Expected: 4, got: 4 - PASS |
| gcc (MinGW-W64 x86_64-posix-seh, built by Brecht Sanders) 9.4.0 | Expected: 2, got: 2 - PASS Expected: 1, got: 1 - PASS Expected: 4, got: 4 - PASS |
console injection
05/Mar/2023
Adding binary arguments through stdin:
echo -ne "blabla\xde\xad\xbe\xef" | ./ch13
Python snippets
05/Mar/2023
Running command with timeout in windows:
import sys
import os
import time
import subprocess

def run_command(cmd_line, timeout_s, verbose=False):
  cmd = cmd_line.split()
  result = False
  pid = None
  try:
    p = subprocess.Popen(cmd, start_new_session=True,
                         stdout=subprocess.PIPE,
                         stderr=subprocess.PIPE,
                         shell=True)
    pid = p.pid
    if verbose: print(f'PID "{pid}" for "{cmd_line}" timeout is "{timeout_s}" seconds')
    (out,err) = p.communicate(timeout=timeout_s)
    ret_code = p.returncode
    result = (ret_code == 0)
    if verbose: print(f'out: {out}\nerr: {err}\nret: {ret_code}')
  except subprocess.TimeoutExpired:
    if verbose: print(f'FAIL: Timeout reached. Killing PID {pid}')
    subprocess.call(['taskkill', '/F', '/T', '/PID', str(pid)])
  except Exception as e:
    if verbose: print(f'FAIL: {e}')
  finally:
    return result

cmds = [
    "DIR C:\\",                 # this command works sucessfuly
    "notepad.exe newfile.txt",  # this command triggers the timeout
    "cmdnotfound",              # this command fails
]

for c in cmds:
    print("\nStarting test")
    ret = run_command(c, 5, True)
    if ret:
        print('SUCCESS')
    else:
        print('FAILURE')
Simple arguments check:
import sys
import os

def show_usage_and_fail():
    print(f'Usage: {sys.argv[0]} <arg1>')
    sys.exit(1)

if len(sys.argv) < 2:
    print(f'Only {len(sys.argv)} arguments provided')
    show_usage_and_fail()

ARG = sys.argv[1]

if not os.path.isfile(ARG):
    print(f'ARG is not a file')
    show_usage_and_fail()

if not os.path.isdir(ARG):
    print(f'ARG is not a folder')
    show_usage_and_fail()
Bash snippets
05/Mar/2023
Check if the variable is empty
#!/bin/bash
ROOTDIR=$PWD

MYARG=$1

fail() {
  echo FAILED
  exit 1
}

if [ -z "$MYARG" ]; then
  echo Arg is empty
  fail
fi

if [ -d $MYARG ]; then
  echo Arg is a folder
  fail
fi

run_some_command
if [ $? -ne 0 ]; then
  echo Command failed
  fail
fi

exit 0
Check running process before starting it again:
#!/bin/bash
NAME="autorun-exec"
RET=0

already_running() {
        counter=0
        pids=$(pgrep -d " " $NAME)
        for p in $pids; do
                (( counter=counter+1 ))
                echo $counter: running with PID $p
        done
        RET=$counter
}


# Abort if we are running already
already_running
if [ $RET -gt 0 ]; then
        echo Exit: $NAME is already running.
        exit
fi


echo Starting process...
sleep 300
Colors
Set in bash PS1 variable like this:
export PS1="\e[47m[\t]\e[0m \u@\[\e[0m\]\[\e[01;37m\]\h\[\e[0m\]\[\e[00;37m\]\\$ \w\n\[\e[0m\]"
Sources:
- https://wiki.archlinux.org/index.php/Color_Bash_Prompt
- http://bashrcgenerator.com/
VirtualBox raw hd access
05/Mar/2023
vboxmanage internalcommands createrawvmdk -filename "my-file.vmdk" -rawdisk \\.\PhysicalDrive<NUMBER_HERE>
Check the drive number in Disk Management
Example:
C:\Program Files\Oracle\VirtualBox>vboxmanage internalcommands createrawvmdk -filename "C:/opt/vms/SATA1_CT1000MX500SSD.vmdk" -rawdisk \\.\PhysicalDrive1
RAW host disk access VMDK file C:/opt/vms/SATA1_CT1000MX500SSD.vmdk created successfully.
Convert PDF to Text
05/Mar/2023
This is a bat script that converts every PDF file in the current directory to a text file. It is necessary that pdf2text is available in the PATH.
I use ag a lot, but unfortunatelly it does not parse PDF files, being unable not search words inside the PDF files. So I convert my PDF files to text and then ag can search its contents.
@echo off
for /r %%i in (*.pdf) do (
	echo %%i
	pdftotext "%%i" "%%i.txt"
)
Measuring elapsed time
05/Mar/2023
Using C++ 11
#include <chrono>

std::chrono::steady_clock::time_point begin = std::chrono::steady_clock::now();

cout << "put busy operation here" << endl;

std::chrono::steady_clock::time_point end = std::chrono::steady_clock::now();
std::cout << "elapsed: "
            << std::chrono::duration_cast<std::chrono::nanoseconds> (end - begin).count()
            << " ns" << std::endl;
Usando GPU com Proxmox e Windows 10
05/Mar/2023
Eu montei um PC novo, com um HW razoável para poder brincar com proxmox e umas VMs. Veio então a ideia de rodar uma VM com windows e uns jogos. E aproveitando já testar como é o compartilhamento dessas GPUs. Meus testes foram com GtX 1050Ti.
Existem muitos procedimentos na web, coisas novas e antigas misturadas, passos configurando coisas que eu não sei se fazem alguma diferença. No fim, funcionou e essas notas tem o objetivo de economizar tempo para o meu eu futuro.
Install Proxmox
Baixei a versão mais atual do PVE: Proxmox virtual environment 7.1 (https://www.proxmox.com/en/downloads/item/proxmox-ve-7-1-iso-installer)
Começamos com o proxmox já não reconhecendo alguns dispositivos da minha placa mãe (bluetooth, wifi...).
Sources
root@munaia:~# cat /etc/apt/sources.list:
deb http://ftp.de.debian.org/debian bullseye main contrib
deb http://ftp.de.debian.org/debian bullseye-updates main contrib
# security updates
deb http://security.debian.org bullseye-security main contrib
# Free PVE repo:
deb http://download.proxmox.com/debian/pve bullseye pve-no-subscription
Comentei esse porque não uso a versão paga:
root@munaia:~# cat /etc/apt/sources.list.d/pve-enterprise.list
#deb https://enterprise.proxmox.com/debian/pve bullseye pve-enterprise
Criando o ZFS
Primeiro, apagar todas as informações de partição dos discos usados (fdisk /dev/sdc)
Depois, com os discos zerados, vai em Create ZFS e adiciona eles. Escolhi RAIDZ e 4 SSDs de 1 TB resultou em espaço usável de 3TB.
Habilitando VLAN
Em network, selecionar a bridge e marcar o checkbox "VLAN aware"
Adicionei um network share
Nesse share tem imagens e arquivos que vou precisar depois. Tive problema com o acesso, é um samba share em outro linux. Para testar a conectividade pode ser usado o seguinte comando:
/usr/bin/smbclient //<server>/share -d 0 -m smb3 -U <username> -c echo 1 0
E para ver quais realmente são os usuários no samba:
sudo pdbedit -L -v
IOMMU Precisa ser habilitado
Na BIOS
- IOMMU = enabled
- NX mode = enabled
- SVM mode = enabled
- VTx ou VTd também.
No grub
root@munaia:~# cat /etc/default/grub
# If you change this file, run 'update-grub' afterwards to update
# /boot/grub/grub.cfg.
# For full documentation of the options in this file, see:
#   info -f grub -n 'Simple configuration'

GRUB_DEFAULT=0
GRUB_TIMEOUT=5
GRUB_DISTRIBUTOR=`lsb_release -i -s 2> /dev/null || echo Debian`
#GRUB_CMDLINE_LINUX_DEFAULT="quiet"
#GRUB_CMDLINE_LINUX_DEFAULT="amd_iommu=on" # esta linha devia ser suficiente, mas nao tive tempo de testar entao estou usando a abaixo (que ja divide os PCIs):
GRUB_CMDLINE_LINUX_DEFAULT="amd_iommu=on pcie_acs_override=downstream,multifunction video=efifb:off quiet splash"

(demais linhas ocultas)
Blacklist drivers
Verificar que os seguintes drivers não serão carregados
root@munaia:~# cat /etc/modprobe.d/pve-blacklist.conf
# This file contains a list of modules which are not supported by Proxmox VE

# nidiafb see bugreport https://bugzilla.proxmox.com/show_bug.cgi?id=701
blacklist nvidiafb

root@munaia:~# cat /etc/modprobe.d/vfio.conf
blacklist nouveau
blacklist nvidia
blacklist nvidiafb
Por via das dúvidads desativamos o output da placa
Rodar o seguinte scripts e anotar o id da placa:
root@munaia:~# cat show-pci.sh
#!/bin/bash
shopt -s nullglob
for g in /sys/kernel/iommu_groups/*; do
    echo "IOMMU Group ${g##*/}:"
    for d in $g/devices/*; do
        echo -e "\t$(lspci -nns ${d##*/})"
    done;
done;
No meu caso:
IOMMU Group 10:
        01:00.1 Audio device [0403]: NVIDIA Corporation GP107GL High Definition Audio Controller [10de:0fb9] (rev a1)
IOMMU Group 9:
        01:00.0 VGA compatible controller [0300]: NVIDIA Corporation GP107 [GeForce GTX 1050 Ti] [10de:1c82] (rev a1)
Então:
root@munaia:~# echo "options vfio-pci ids=10de:1c82,10de:0fb9 disable_vga=1" >> /etc/modprobe.d/vfio.conf
Finalmente:
root@munaia:~# update-initramfs -u
root@munaia:~# reboot
Criar a VM de windows
- Machine: q35
- BIOS UEFI
- Display: Default
- Adicionar o PCI Device com id da GTX (não precisa o da placa de som)
- Marcar "All functions" & "PCI-Express". Não marcar no "Primary GPU" (apenas depois do windows estar instalado para evitar ficar sem video)
Importate
Por algum motivo, o driver de som (que é da NVIDIA na VM) as vezes dá uma engasgada (ao usar diretamente a saída HDMI da VM) mas acessando por RDP funciona bem.
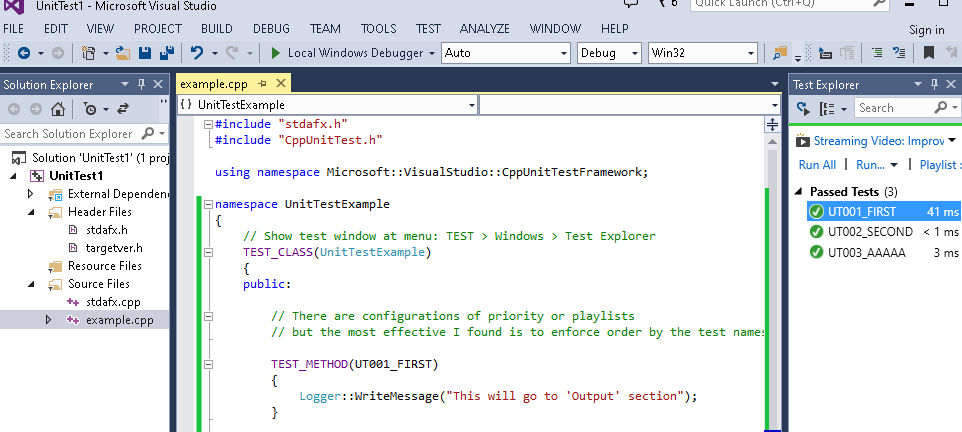
UnitTest in Visual Studio (Native Unit Test Project)
05/Mar/2023
Example of unit test project features in Visual Studio 2013.
Snippet example:
#include "stdafx.h"
#include "CppUnitTest.h"

using namespace Microsoft::VisualStudio::CppUnitTestFramework;

namespace UnitTestExample
{
    // Show test window at menu: TEST > Windows > Test Explorer
    TEST_CLASS(UnitTestExample)
    {
    public:

        // There are configurations of priority or playlists
        // but the most effective I found is to enforce
        // the execution order by the test names:

        TEST_METHOD(UT001_FIRST)
        {
            Logger::WriteMessage("This will go to 'Output' section");
        }

        TEST_METHOD(UT002_SECOND)
        {
            Assert::IsTrue(true, L"Message printed when it fails", LINE_INFO());
        }


        TEST_METHOD(UT003_AAAAA)
        {
            std::wstringstream buff;
            buff << "Nice message" << " with variables " << 123;
            Logger::WriteMessage(buff.str().c_str());

            Assert::AreNotEqual(true, false, buff.str().c_str(), LINE_INFO());
        }
    };
}
Source files here
NGINX configs
05/Mar/2023
Guacamole proxy
Change access url from the default URL http://127.0.0.1:8080/guacamole to another port
In the site config file /etc/nginx/sites-available/guacamole_server.conf:
server {
    listen 8000;
    location / {
        proxy_pass http://127.0.0.1:8080/guacamole/;
        include proxy_params;
    }
}
sudo systemctl restart nginx.service
code-runner websockets
Enable websocket the site config file /etc/nginx/sites-available/code_server.conf:
server {
    listen 8000;

    location / {
        proxy_pass http://127.0.0.1:8081/;
        proxy_http_version 1.1;
        proxy_set_header Upgrade $http_upgrade;
        proxy_set_header Connection "Upgrade";
        proxy_set_header Host $host;
    }
}
sudo systemctl restart nginx.service
HTTP Basic Authentication
Add the auth_basic lines to the server config file.
Create the .htpasswd in /etc/nginx/.htpasswd.
Then add the auth_basic lines in the server config file (e.g: /etc/nginx/sites-available/default)
server {
    listen 80 default_server;
    listen [::]:80 default_server;

    auth_basic "Restricted Content";
    auth_basic_user_file /etc/nginx/.htpasswd;
Finally, add the users to the password file:
#!/bin/bash

echo run this command:
echo sudo sh -c "echo -n 'myusername:' >> /etc/nginx/.htpasswd"
echo sudo sh -c "openssl passwd -apr1 >> /etc/nginx/.htpasswd"
VSCode in Browser
05/Mar/2023
Install code-server in ubuntu: https://coder.com/docs/code-server/latest/install#debian-ubuntu
sudo apt update && sudo apt upgrade -y && apt install htop curl -y
For this example, an account called user (with sudo rights) is used to run the following commands:
curl -fsSL https://code-server.dev/install.sh | sh -s -- --dry-run

curl -fsSL https://code-server.dev/install.sh | sh
And finally:
sudo systemctl enable --now code-server@$USER
# Now visit http://127.0.0.1:8080. Your password is in ~/.config/code-server/config.yaml
html diff
07/Mar/2023
import difflib
import sys

fromfile = "A.html"
tofile   = "B.html"
fromlines = open(fromfile, 'U').readlines()
tolines = open(tofile, 'U').readlines()

diff = difflib.HtmlDiff().make_file(fromlines,tolines,fromfile,tofile)

sys.stdout.writelines(diff)
build windows .exe in linux
07/Mar/2023
sudo apt-get install mingw-w64

# 32 bits
i686-w64-mingw32-gcc -o main32.exe main.c

# 64 bits
x86_64-w64-mingw32-gcc -o main64.exe main.c
List big files in python
25/Apr/2023
import os
import sys

ONE_MB=1048576 #bytes
THRESH=ONE_MB*50 # 1MB*N

def get_size_bytes(filename):
    st = os.stat(filename)
    return st.st_size

if len(sys.argv) < 2:
    print(f"usage: {sys.argv[0]} root")
    exit(1)

for currentpath, folders, files in os.walk(sys.argv[1]):
    for file in files:
        full_path = os.path.join(currentpath, file)
        bytes_size = get_size_bytes(full_path)
        if bytes_size > THRESH:
            print(f"{full_path}\t{(bytes_size/ONE_MB):0.1f} mb")
RS232 Transmission
16/Jul/2023
Windows
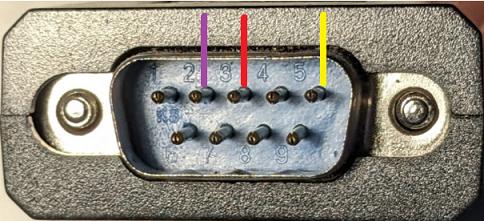
Connection
USB-SERIAL CH340 adapter pinout:
- 2 RX
- 3 Tx
- 5 GND
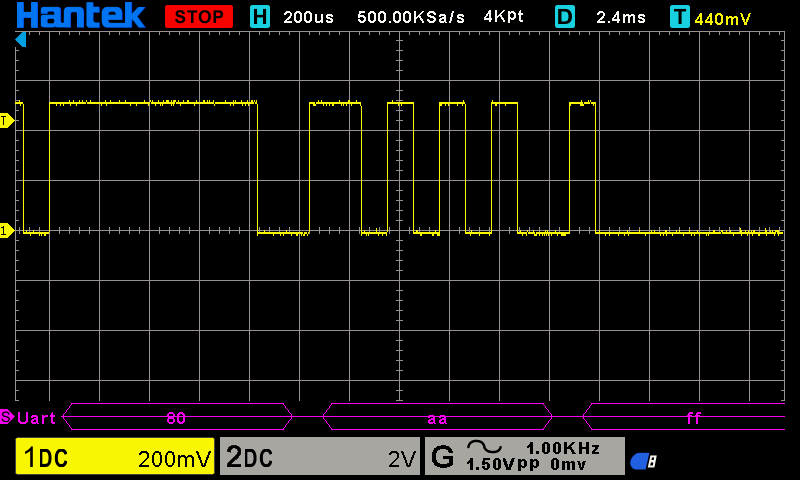
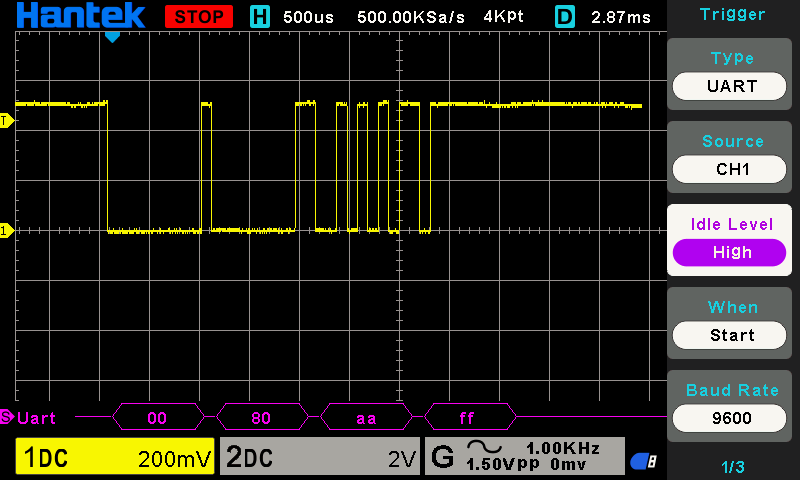
Sending data
Python example to write data to the serial port from Windows:
import serial
import time

ser = serial.Serial(
    port='COM3',\
    baudrate=9600,\
    parity=serial.PARITY_NONE,\
    stopbits=serial.STOPBITS_ONE,\
    bytesize=serial.EIGHTBITS,\
    timeout=0)

while(1):
    ser.write(b'\x00\x80\xaa\xff')
    time.sleep(1)

ser.close()
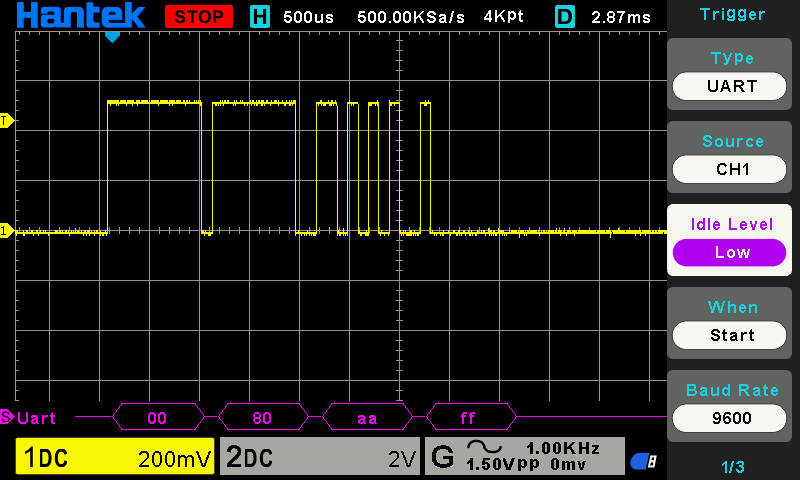
Waveforms
In this adapter, the idle level is low:
Arduino Duemilanove
Connection
Digital pin 1 and gnd.
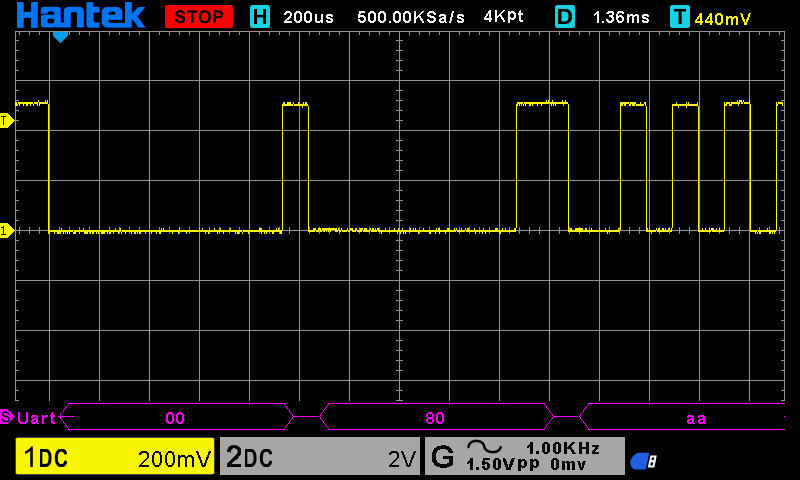
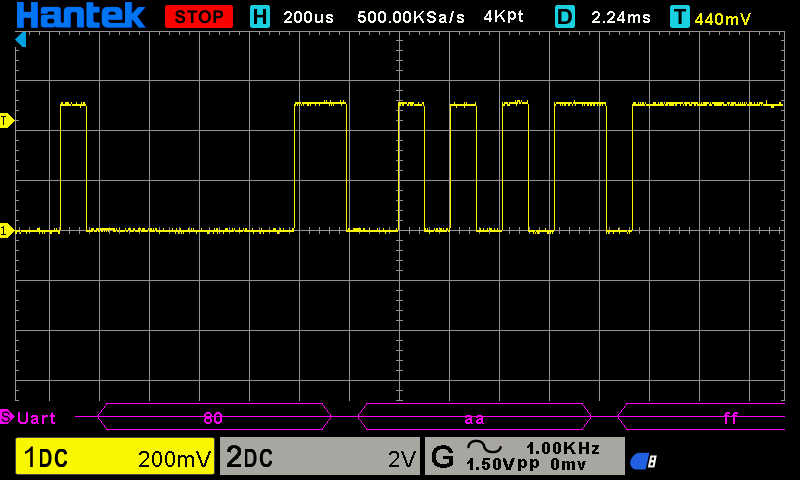
Sending data
Arduino example to write to the serial port:
void setup() {
  Serial.begin(9600);
}

void loop() {
  char data[4] = {0x0, 0x80, 0xaa, 0xff};
  Serial.write(data, 4);
  delay(500);
}
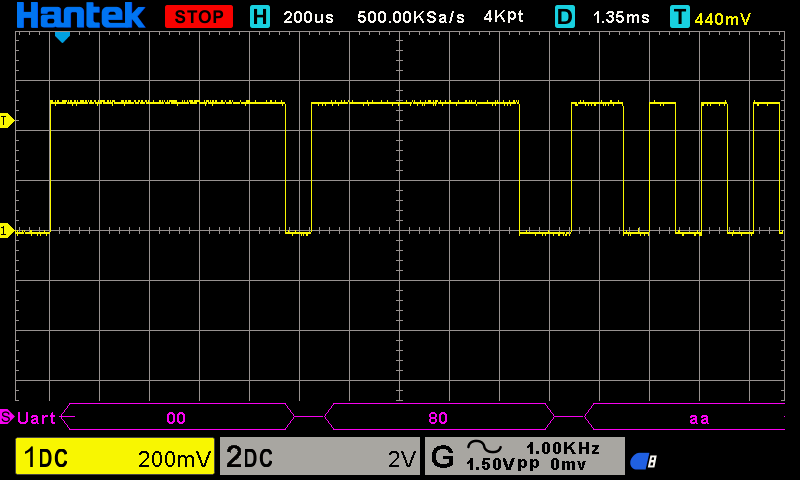
Waveforms
Idle level is high:
Windows XP notes
30/Jul/2023
Accessing shares from Network
Winsows XP only supports SMB 1.0, so for a Windows 10/11 machine to be able to access those shares the 'SMB 1.0/CIFS Client' must be enabled in Windows Features.
List file size in disk
26/Dec/2023
List all files bigger than size in a given path
import os
import sys

def run(path, minsize = 0):
    for root, directories, files in os.walk(path):
        for name in files:
            fullpath = os.path.join(root, name)
            try:
                filesize = os.path.getsize(fullpath)
                if filesize >= minsize:
                    print(f'{filesize:>11} {fullpath}')
            except OSError as e:
                print(f'cannot read {name}: {e}')
            except Exception as e:
                print(f'ignoring {name}: {e}')

if __name__ == '__main__':
    if len(sys.argv) < 2:
        print(f'usage:\n\t{sys.argv[0]} <root path> [minimum size e.g.: 1M]')
        exit(0)

    root = os.path.abspath(sys.argv[1])
    size = 0
    # if the user provided a minimum size, get the value in bytes
    if len(sys.argv) > 2:
        filesize = sys.argv[2]
        if filesize.upper().endswith('K'):
            size = int(filesize.replace('K',''))
            size = size * 1000
        elif filesize.upper().endswith('M'):
            size = int(filesize.replace('M',''))
            size = size * 1000 * 1000
        elif filesize.upper().endswith('G'):
            size = int(filesize.replace('G',''))
            size = size * 1000 * 1000 * 1000
        else:
            try:
                size = int(filesize)
            except Exception as e:
                print(f'failed to convert minimum size: {e}')
                exit(0)

    run(root, size)
hdf5 building and testing
07/Jan/2024
Windows with MinGW
Let's try to build using MinGW, although not officially supported.
1. Create a local workspace folder
mkdir C:\workspace && cd C:\workspace\hdf5build
The root dir for our tests is folder C:\workspace\hdf5build.
2. Get the sources
To this test I got CMake-hdf5-1.10.9.zip
Unzip to the workspace folder.
Create another folder called install to be the final location of the binaries
3. Check your path
MinGW mingw32-make, gcc and the other bins should be reachable from the terminal (test this now before proceeding).
So far the dir looks like this
C:\workspace\hdf5build>dir
 Volume in drive C has no label.
 Volume Serial Number is 98B5-97B1

 Directory of C:\workspace\hdf5build

07/01/2024  00:40    <DIR>          CMake-hdf5-1.10.9
06/03/2023  22:42        34.826.532 CMake-hdf5-1.10.9.zip
07/01/2024  09:59    <DIR>          install
4. Starting build...
Enter the code folder: cd CMake-hdf5-1.10.9
Create the build folder and cd into it: mkdir build && cd build
Run cmake:
cmake -G "MinGW Makefiles" -DCMAKE_BUILD_TYPE:STRING=Release -DHDF5_BUILD_FORTRAN:BOOL=OFF -DHDF5_BUILD_JAVA:BOOL=OFF -DCMAKE_INSTALL_PREFIX:PATH=C:\workspace\hdf5build\install\HDF5 DHDF5_ENABLE_SZIP_SUPPORT:BOOL=OFF -DHDF5_ENABLE_Z_LIB_SUPPORT:BOOL=OFF -DBUILD_TESTING:BOOL=ON -DHDF5_BUILD_TOOLS:BOOL=ON ..\hdf5-1.10.9
Run mingw32-make to build
Run mingw32-make test to build and run the self tests. In my case 3 tests failed... I will install anyway for now
99% tests passed, 6 tests failed out of 2071

Total Test time (real) = 259.42 sec

The following tests FAILED:
          2 - H5TEST-testhdf5-base (Failed)
          7 - H5TEST-cache_api (Failed)
         23 - H5TEST-dt_arith (Failed)
         86 - H5TEST-err_compat (Failed)
         87 - H5TEST-error_test (Failed)
        1649 - H5DUMP-tfloatsattrs (Failed)
Run mingw32-make install to install
Result: install-MinGW-hdf5-1.10.9.zip
Windows with Visual Studio
No need to build, just get prebuilt from the release page https://github.com/HDFGroup/hdf5/releases
Toshiba Satellite 4000CDT
10/Jan/2024
Identification Label
TOSHIBA
4000CDT/4.0 SYSTEM YBUT
MODEL NO. PA1273E YXCD
DC 15V
3.0 A
SERIAL NO. X8040988
Manufacture year: 1997
Useful links:
- About the model: https://www.computinghistory.org.uk/det/46780/Toshiba-Satellite-S4000CDS-4-0/
- Recovery image (german) https://archive.org/details/4000-4010-4020-rc-2-win-98-disc-1
- Service manuals: https://www.minuszerodegrees.net/manuals/Toshiba/Atlas/Toshiba_Atlas.htm
- Overall info about Toshibas: https://www.minuszerodegrees.net/manuals/Toshiba/Toshiba.htm
- SETUP programs: https://www.minuszerodegrees.net/manuals/Toshiba/Setup/Toshiba_setup.htm
- Battery: https://wiki.droids-corp.org/articles/m/a/g/Maggie/Electronics/Accu.html
Error Messages (so far...)
Stuck in CMOS
**** Bad check sum (CMOS) ****
Check system. Then press [F1] key.
Not sure if F1 key works, I press and it does nothing!!!
UPDATE: some keyboard keys were defective. Pressing F1 via PS/2 keyboard allowed the CMOS to be saved and this message disapeared! Some trails in the keyboard membrane were corroded. I could fix it using conductive paint + superglue to put the keyboard back after the plastic rivets were destroyed in disassembly.
Related posts:
- Bad RTC Battery/Bad Checksum (CMOS) BIOS Error on Bootup : https://support.dynabook.com/support/viewContentDetail?soid=355107
From Toshiba Satellite 100CS - Maintenance Manual.pdf we see the following troubleshooting section (MAY NOT BE APPLICABLE TO THIS MODEL):
2.4 System Board and HDD I/F Board Troubleshooting

This section describes how to determine if the system board and sound board are defective or not functioning properly. Start with Procedure 1 and continue with the other procedures as instructed. The procedures described in this section are:
    Procedure 1: Message Check
    Procedure 2: Printer Port LED Check on Boot Mode
    Procedure 3: Printer Port LED Check on Resume Mode
    Procedure 4: Diagnostic Test Program Execution Check
    Procedure 5: Replacement Check

Procedure 1 Message Check
    When the power is turned on, the system performs the Initial Reliability Test (IRT) installed in the BIOS ROM. The IRT tests each IC on the system board and initializes it.
    ❑ If an error message is shown on the display, perform Check 1.
    ❑ If there is no error message, go to Procedure 2.
    ❑ If the Toshiba MS-DOS is properly loaded, go to Procedure 3.

Check 1

    If one of the following error messages is displayed on the screen, press the F1 key as the message instructs. These errors occur when the system configuration preserved in the RTC memory (CMOS type memory) is not the same as the actual
configuration or when the data is lost.

    If you press the F1 key as the message instructs, the system configuration in the
RTC memory configuration is set to the default setting. If error message (b) appears often when the power is turned on, replace the RTC battery. If any other error message is displayed, perform Check 2.
    (a) *** Bad HDD type ***
    Check system. Then press [F1] key ......
    (b) *** Bad RTC battery ***
    Check system. Then press [F1] key ......
    (c) *** Bad configuration ***
    Check system. Then press [F1] key ......
    (d) *** Bad memory size ***
    Check system. Then press [F1] key ......
    (e) *** Bad time function ***
    Check system. Then press [F1] key ......

    (f) *** Bad check sum (CMOS) ***
    Check system. Then press [F1] key ......

    (g) *** Bad check sum (ROM) ***
    Check system. Then press [F1] key ......
From Satellite P300/ProP300 we see the following troubleshooting section (MAY NOT BE APPLICABLE TO THIS MODEL):
Procedure 1 Message Check
When the power is turned on, the system performs the Power On Self Test (POST) installed in the BIOS ROM. The POST tests each IC on the system board and initializes it.
If an error message is shown on the display, perform Check 1.
If there is no error message, go to Procedure 2.
If MS-DOS or Windows XP is properly loaded, go to Procedure 4.
Check 1
If one of the following error messages is displayed on the screen, press the F1 key as the message instructs. These errors occur when the system configuration
preserved in the RTC memory (CMOS type memory) is not the same as the actual configuration or when the data is lost. If you press the F1 key as the message instructs, the SETUP screen appears to set the system configuration. If error message (b) appears often when the power is turned on, replace the RTC battery. If any other error message is displayed,
perform Check 2.
(a) *** Bad HDD type ***
Check system. Then press [F1] key ......
(b) *** Bad RTC battery ***
Check system. Then press [F1] key ......
(c) *** Bad configuration ***
Check system. Then press [F1] key ......
(d) *** Bad memory size ***
Check system. Then press [F1] key ......
(e) *** Bad time function ***
Check system. Then press [F1] key ......
(f) *** Bad check sum (CMOS) ***
Check system. Then press [F1] key ......
(g) *** Bad check sum (ROM) ***
Check system. Then press [F1] key ......
Key combinations
C
Press and hold the c key and turn on the computer to boot from CD-ROM. This is useful when using the restoring disks.
Esc
Press and hold the Esc key and turn on the computer to stop normal boot and enter BIOS.
Ctrl + Alt + Del
Restart the laptop.
Tab
The message:
Ready for EC/KBC update. Place the EC/KBC update diskette in the drive, and press any key when ready to proceed
is displayed with the following steps:
- Power off the unit.
- Press and hold Tab
- Press the power button to turn on the computer
- The following message is displayed:
F12
The message:
Ready for BIOS update. Place the BIOS update diskette in the drive, and press any key when ready to proceed.
is displayed with the following steps:
- Power off the unit.
- Press and hold F12
- Press the power button to turn on the computer
- The following message is displayed:
I was able to find and generate a workable update diskette using 1400cv82.exe
Unfortunatelly the link from support is broken: https://support.dynabook.com/support/viewContentDetail?contentId=120386
This indicates that the BIOS for the following models are the same: 4000/4005/4010/4015/4020/4025
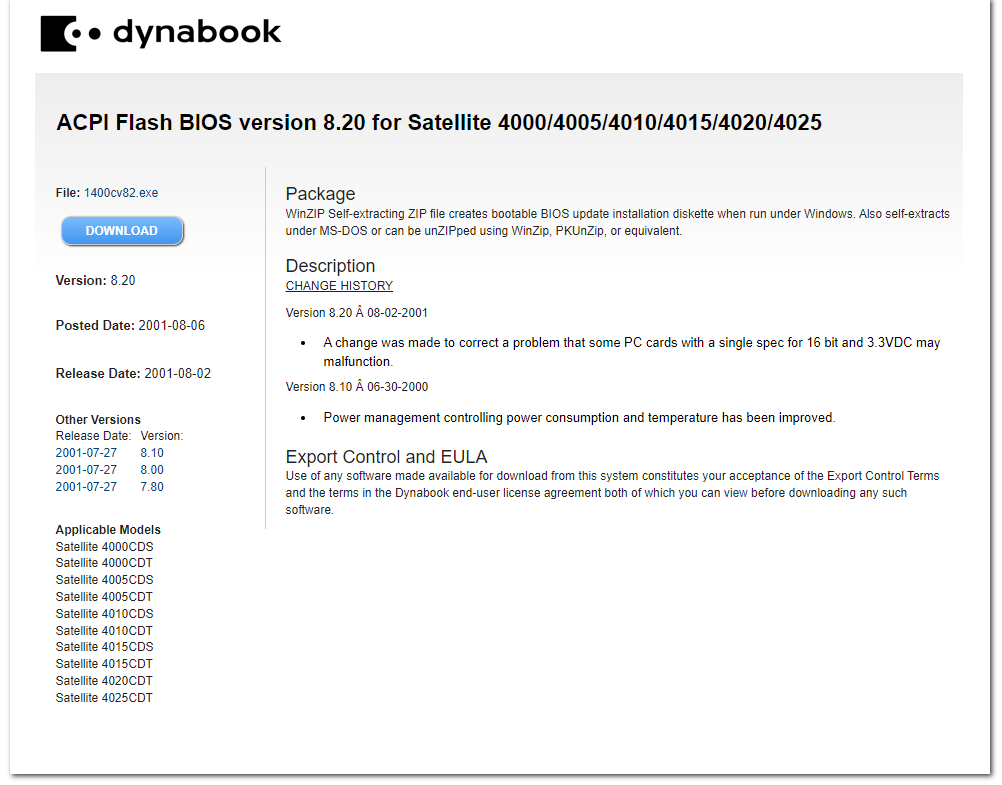
Bios README.TXT
README.TXT                                                     08-04-2001 CDC
Flash BIOS version 8.20 for Satellite 4000C Series
=============================================================================

This BIOS is applicable to the following models:

Satellite 4000CDS
Satellite 4000CDT
Satellite 4005CDS
Satellite 4005CDT
Satellite 4010CDS
Satellite 4010CDT
Satellite 4015CDS
Satellite 4015CDT
Satellite 4020CDT
Satellite 4025CDT

For purposes of this document, the term "Satellite 4000C Series"
is used to generically refer to all of the models listed above.
=============================================================================

This archive contains the following files:

README.TXT      Installation/usage instructions in ASCII text format
README.COM      Self-displaying version of installation/usage instructions
1117D820.EXE    Self-extracting diskette image of BIOS install diskette
BIOFC19T.COM    Flash BIOS 8.20 image for Satellite 4000C Series
                (provided here for installation methods 2 and 3)
CHGBIOSA.EXE    Flash BIOS update utility version 4.02
                (provided here for installation methods 2 and 3)
INSTINFO.BAT    DOS batch file that creates install disk and displays README
                file

This BIOS version is Windows 2000 compatible and supports Plug and Play,
and ACPI functionality.

********************************** CAUTION! *********************************
*****************************************************************************

During the upgrading of your computers BIOS, if the computer loses power or
fails to complete the process of upgrading the BIOS, the existing BIOS in
the computer may become damaged. In the event of this occurring, the
BIOS Key Installation Method, described below, can be used to recover from
this error condition.

If you are upgrading a number of computers with this BIOS, the BIOS Key
installation method is the quickest.

It is recommended that all PCMCIA cards be removed from the system prior to
upgrading the BIOS.  Also recommended is detaching the computer from any
docking device (Desk Station, port replicator, etc.) which may be attached.

It is not unusual to see a CMOS error when you first reboot the computer after
installing the new BIOS.  If you see this message on your screen, press F1 as
instructed.  This displays the "TSETUP" screen. Press <End> to save the CMOS
data.  You won't see the CMOS error again.


******************** BIOS INSTALLATION INSTRUCTIONS *************************
*****************************************************************************

There are three ways to install this BIOS version:

1) Use the bootable diskette that is automatically created by the Windows
   UnZip process (Recommended)

2) At startup by holding down the F12 key.

3) Run CHGBIOSA.EXE at the command prompt.

*****************************************************************************


1) BOOT DISKETTE INSTALLATION METHOD (Recommended)
--------------------------------------------------

This release of the electronic distribution BIOS utilizes a self-extracting
ZIP file that, when run under Windows or Win-OS2, creates a bootable BIOS
installation diskette.

Since you're reading this, you were obviously able to extract the downloaded
file.  If you also created the BIOS installation diskette as a part of the
extraction process, you're ready to follow the installation instructions
below.

If you didn't create the installation diskette during the extraction phase,
or if you extracted the downloaded file with PKUnZip or WinZip, you can
create the installation diskette by executing the INSTINFO program from the
DOS command prompt.

Install this BIOS using the following steps:

WINDOWS 9x, Me, 2000, NT:

      o Close all open programs
      o Insert the BIOS installation diskette into your diskette drive (A:)
      o Click Start
      o Click Shutdown
      o Click the radio button next to "Restart the computer?"
      o Click Yes

WINDOWS 3.x:

      o Close all open programs
      o From Program Manager, click on File/Exit Windows
        Windows exits to a MS-DOS command prompt
      o Insert the BIOS installation diskette into your diskette drive (A:)
      o Press Ctrl-Alt-Del (press and hold the <Ctrl> and <Alt> keys and press
        the <Del> key) to restart the system

OTHER OPERATING SYSTEMS

      o Close all open programs
      o Shut down the operating system
      o Insert the BIOS installation diskette into your diskette drive (A:)
      o Restart the computer by pressing Ctrl-Alt-Del or turning the computer
        OFF then on again

The computer will boot MS-DOS from the BIOS installation diskette, and
initiate the Flash BIOS installation routine.  When the Flash BIOS
installation is complete, the success message is displayed:


        Please push the RESET SW (or turn AC power OFF/ON) to restart!

                             ROM Write Successful!
                               Utility Finished!


Eject the diskette from drive A: and turn the computer OFF then ON, or press
the reset switch to restart your computer.


ADDITIONAL INFORMATION REGARDING THIS RELEASE
---------------------------------------------

If you are unable to use the Windows self-extractor, the self-extracting
ZIP archive can be extracted by executing it from a DOS prompt or it can be
extracted using PKUNZIP 2.04G or an equivalent UnZIP utility.  A DOS batch
file, INSTINFO.BAT is provided in the ZIP archive which will create the BIOS
installation diskette.  If all else fails, you can execute the
self-extracting diskette image manually.  This file is named 1117D820.EXE, and
needs a parameter of A: (1117D820 A:) to successfully create the diskette in
drive A:

The self-extracting diskette image, 1117D820.EXE, will run under MS-DOS or a
command prompt under Windows 9x, Me, 2000, NT, or OS/2.  PLEASE NOTE that long
directory names in  the path where the self-extracting image file is stored
under Windows 9x or NT/2K will cause the self-extracting image to abort.  Long
directory names are supported under OS/2.


2) BIOS KEY INSTALLATION METHOD
---------------------------

Your Toshiba computer has a special keyboard function to install an
updated BIOS image.

To use this function, hold down the F12 key while the computer is
powered on.  The computer MUST be in BOOT mode, not Resume mode.

This installation method will only work with the internal keyboard.  If
your computer is docked with the display closed and you are using an external
keyboard, the computer will need to be undocked and the internal keyboard's
F12 key used.

When the computer starts up with the F12 key depressed, the following
message appears:

'Ready for BIOS update. Place the BIOS diskette in the drive, and press
any key when ready to proceed.'

Insert the diskette that contains CHGBIOSA.EXE and BIOFC19T.COM,
and press any key.  The CHGBIOSA program will automatically load the
BIOFC19T.COM file.

3) RUN CHGBIOSA.EXE AT THE COMMAND PROMPT
-----------------------------------------

The CHGBIOSA program is designed to be run from the MS-DOS command
prompt.  It cannot be run in a DOS box inside of Windows 3.x, Windows 9x,
OS/2 or other operating systems.  It also will not run if a Memory Manager,
like EMM386, is loaded.  The CHGBIOSA program can be run from a
floppy disk, hard drive, or PCMCIA drive.  However, you will need a floppy
diskette (high or low density) in your A: drive at the time the CHGBIOSA
program is run.

When the CHGBIOSA program is executed by itself, it will prompt you
to specify where the BIOS image file, BIOFC19T.COM is located.  Enter
the complete path and file name. Example: C:\1400CV82\BIOFC19T.COM.

NOTE!
-----

If your path for BIOFC19T.COM is anywhere other than the root directory
of the A: drive (A:\BIOFC19T.COM), CHGBIOSA will copy the BIOS image
file from its current location to the root directory of A: drive.


Optionally, the CHGBIOSA program can also be run from a single command
which includes the path to the BIOFC19T.COM file.

   Example: CHGBIOSA C:\1400CV82\BIOFC19T.COM


CHANGE HISTORY
--------------

Version 8.20  08-02-2001
  o  A change was made to correct a problem that some PC cards with a
     single spec for 16 bit and 3.3VDC may malfunction.


Version 8.10  06-30-2000
  o  Power management controlling power consumption and temperature has
     been improved.


Version 8.00  02-08-2000
  o  A change was made to support Windows 2000.
  o  Corrected a problem where having the "USB Legecy=Enabled" set in the
     BIOS, and entering some keys on a Japanese USB keyboard, was
     impossible.
  o  Correct a rare problem when printing a text file from a DOS shell in
     Windows 95.
  o  Corrected a rare problem witht eh HDD password.  When the HDD password
     was registered, and the computer set to standby mode, resuming the
     computer would lead to a blue screen error.
  o  Corrected a problem when running Windows 2000.  If VGA segment address
     was set to E4000h, a blue screen error would occur
  o  Corrected a problem while running the HCT test.  In the ACPI test, the
     CPU Throttle subtest would result in a false error.
  o  Corrected a problem while running the HCT test.  In the ACPI Test,
     executing the USB subtest would result in a false error.
  o  When copying a file from a 120MB FDD, using a Super Disk (LS-120),
     while running Windows 95/98, and then attempting to open that file
     under DOS mode, caused files, in excess of 50MB, to be corrupted.
  o  Corrected a problem where having the "USB Legecy=Enabled" set in the
     BIOS, and entering the "Pause" key several times caused the key to
     repeat on it's own.
  o  Corrected a problem when the Power ON/OFF was set to Enable, and
     system goes into Hibernation with the LCD panel closed. If  an AC
     Adaptor was connected after opening the display panel,  the computer
     would "wake up" on its own.
  o  Corrected a problem of installing a driver from the FDD.  Installing a
     driver was impossible when a new device was detected during Windows 98
     installation.
  o  Corrected a problem that when, after preinstalling Windows 95/98,
     executing hibernation without shutting down the system resulted in
     intermittent hibernation error.
  o  The control method of the system status (Sx) was changed.


Version 7.80  02-22-1999
  o  Corrected a problem in Windows '98 with a hang when operating under
     ACPI mode.  C3 state function was disabled completely.


Version 7.70  12-07-1998
  o  Corrected a problem where the system would hang under ACPI mode of
     Win98 when going into a C3 state.
  o  Corrected a problem with systems using a Sharp LCD, where the entire
     screen becomes white when it is set to standby mode.
  o  Corrected a problem where, when using an incorrect key floppy
     diskette, the password would be canceled.
  o  Corrected a problem where, after hibernation is executed one time, the
     hibernation will continue to work even though the hibernation setting
     was canceled.
  o  Corrected a problem where some PC cards don't work under Win2000.
     This is caused by a mis-match of PCMCIA data between the IRQ routing
     table and the hardware.
  o  Corrected a problem where suspending or resuming the system under
     Win95 or Win98 would lead to an all white or all black LCD.


Version 7.60  09-09-1998
  o  On the Satellite 4020, the time from power-on to receiving the
     external KB initialization end code was shortened to 2.5 seconds.
  o  Corrected a problem with the system hanging during the power on
     sequence if the system is set to CardBus/16 bit mode, with an R2 card
     (such as a modem card) installed in the system.
  o  Corrected a problem where, under Windows NT, disconnecting the AC
     adapter with the system set to Display Auto Off, the display would
     turn on.
  o  Corrected a possible problem with a system shutdown, even if the CPU
     module's ambient temperature does not reach the point of system
     shutdown.


Version 7.40  11-18-1998
  o  Initial Production BIOS for Satellite 4000/4005


 **end**
Setup WRP - Web Rendering Proxy
14/Jan/2024
Into the ubuntu server LXC as root:
cd /opt

# install proxy
wget https://github.com/tenox7/wrp/releases/download/4.6.2/wrp-amd64-linux
chmod +x wrp-amd64-linux

# install chrome
apt-get install libxss1 libappindicator1 libindicator7
wget https://dl.google.com/linux/direct/google-chrome-stable_current_amd64.deb
apt install ./google-chrome*.deb

apt-get install -f

apt install htop
Add to crontab
@reboot /opt/wrp-amd64-linux -l :80 -t=gif -g=800x600x16
Public FTP config with vsftpd
14/Jan/2024
Create the folder
mkdir -p /var/ftp/pub
hown nobody:nogroup /var/ftp/pub
chmod 777 /var/ftp/pub
Edit /etc/vsftpd.conf as follows:
# Example config file /etc/vsftpd.conf
#
# The default compiled in settings are fairly paranoid. This sample file
# loosens things up a bit, to make the ftp daemon more usable.
# Please see vsftpd.conf.5 for all compiled in defaults.
#
# READ THIS: This example file is NOT an exhaustive list of vsftpd options.
# Please read the vsftpd.conf.5 manual page to get a full idea of vsftpd's
# capabilities.
#
#
# Run standalone?  vsftpd can run either from an inetd or as a standalone
# daemon started from an initscript.
listen=NO
#
# This directive enables listening on IPv6 sockets. By default, listening
# on the IPv6 "any" address (::) will accept connections from both IPv6
# and IPv4 clients. It is not necessary to listen on *both* IPv4 and IPv6
# sockets. If you want that (perhaps because you want to listen on specific
# addresses) then you must run two copies of vsftpd with two configuration
# files.
listen_ipv6=YES
#
# Allow anonymous FTP? (Disabled by default).
anonymous_enable=YES
#
# Uncomment this to allow local users to log in.
local_enable=NO
#
# Uncomment this to enable any form of FTP write command.
write_enable=YES
#
# Default umask for local users is 077. You may wish to change this to 022,
# if your users expect that (022 is used by most other ftpd's)
#local_umask=022
#
# Uncomment this to allow the anonymous FTP user to upload files. This only
# has an effect if the above global write enable is activated. Also, you will
# obviously need to create a directory writable by the FTP user.
anon_upload_enable=YES
#
# Uncomment this if you want the anonymous FTP user to be able to create
# new directories.
#anon_mkdir_write_enable=YES
#
# Activate directory messages - messages given to remote users when they
# go into a certain directory.
dirmessage_enable=YES
#
# If enabled, vsftpd will display directory listings with the time
# in  your  local  time  zone.  The default is to display GMT. The
# times returned by the MDTM FTP command are also affected by this
# option.
use_localtime=YES
#
# Activate logging of uploads/downloads.
xferlog_enable=YES
#
# Make sure PORT transfer connections originate from port 20 (ftp-data).
connect_from_port_20=YES
#
# If you want, you can arrange for uploaded anonymous files to be owned by
# a different user. Note! Using "root" for uploaded files is not
# recommended!
#chown_uploads=YES
#chown_username=whoever
#
# You may override where the log file goes if you like. The default is shown
# below.
#xferlog_file=/var/log/vsftpd.log
#
# If you want, you can have your log file in standard ftpd xferlog format.
# Note that the default log file location is /var/log/xferlog in this case.
#xferlog_std_format=YES
#
# You may change the default value for timing out an idle session.
#idle_session_timeout=600
#
# You may change the default value for timing out a data connection.
#data_connection_timeout=120
#
# It is recommended that you define on your system a unique user which the
# ftp server can use as a totally isolated and unprivileged user.
#nopriv_user=ftpsecure
#
# Enable this and the server will recognise asynchronous ABOR requests. Not
# recommended for security (the code is non-trivial). Not enabling it,
# however, may confuse older FTP clients.
#async_abor_enable=YES
#
# By default the server will pretend to allow ASCII mode but in fact ignore
# the request. Turn on the below options to have the server actually do ASCII
# mangling on files when in ASCII mode.
# Beware that on some FTP servers, ASCII support allows a denial of service
# attack (DoS) via the command "SIZE /big/file" in ASCII mode. vsftpd
# predicted this attack and has always been safe, reporting the size of the
# raw file.
# ASCII mangling is a horrible feature of the protocol.
#ascii_upload_enable=YES
#ascii_download_enable=YES
#
# You may fully customise the login banner string:
#ftpd_banner=Welcome to blah FTP service.
#
# You may specify a file of disallowed anonymous e-mail addresses. Apparently
# useful for combatting certain DoS attacks.
#deny_email_enable=YES
# (default follows)
#banned_email_file=/etc/vsftpd.banned_emails
#
# You may restrict local users to their home directories.  See the FAQ for
# the possible risks in this before using chroot_local_user or
# chroot_list_enable below.
#chroot_local_user=YES
#
# You may specify an explicit list of local users to chroot() to their home
# directory. If chroot_local_user is YES, then this list becomes a list of
# users to NOT chroot().
# (Warning! chroot'ing can be very dangerous. If using chroot, make sure that
# the user does not have write access to the top level directory within the
# chroot)
#chroot_local_user=YES
#chroot_list_enable=YES
# (default follows)
#chroot_list_file=/etc/vsftpd.chroot_list
#
# You may activate the "-R" option to the builtin ls. This is disabled by
# default to avoid remote users being able to cause excessive I/O on large
# sites. However, some broken FTP clients such as "ncftp" and "mirror" assume
# the presence of the "-R" option, so there is a strong case for enabling it.
#ls_recurse_enable=YES
#
# Customization
#
# Some of vsftpd's settings don't fit the filesystem layout by
# default.
#
# This option should be the name of a directory which is empty.  Also, the
# directory should not be writable by the ftp user. This directory is used
# as a secure chroot() jail at times vsftpd does not require filesystem
# access.
secure_chroot_dir=/var/run/vsftpd/empty
#
# This string is the name of the PAM service vsftpd will use.
pam_service_name=vsftpd
#
# This option specifies the location of the RSA certificate to use for SSL
# encrypted connections.
rsa_cert_file=/etc/ssl/certs/ssl-cert-snakeoil.pem
rsa_private_key_file=/etc/ssl/private/ssl-cert-snakeoil.key
ssl_enable=NO

#
# Uncomment this to indicate that vsftpd use a utf8 filesystem.
#utf8_filesystem=YES

#
# Point users at the directory we created earlier.
anon_root=/var/ftp/
#
# Stop prompting for a password on the command line.
no_anon_password=YES
#
# Show the user and group as ftp:ftp, regardless of the owner.
hide_ids=YES
#
# Limit the range of ports that can be used for passive FTP
pasv_min_port=40000
pasv_max_port=50000

# allow anonymous user to delete files
anon_other_write_enable=YES
ACPI MSDM table (PC windows serial)
11/Feb/2024
To see the saved contents run:
sudo cat /sys/firmware/acpi/tables/MSDM
Example output:
MSDMUbLENOVOTP-N2U PPTECFZGFK-ABCDE-12345-FGHIJ-67890
To get the data as binary:
sudo acpidump -n MSDM -b > msdm.dat
Install "acpica-tools" package to use acpidump
VirtualBox can use this file in the VM to get the serial directly:
vboxmanage setextradata "VM name" "VBoxInternal/Devices/acpi/0/Config/CustomTable" /the/path/to/msdm.dat